
Desserts
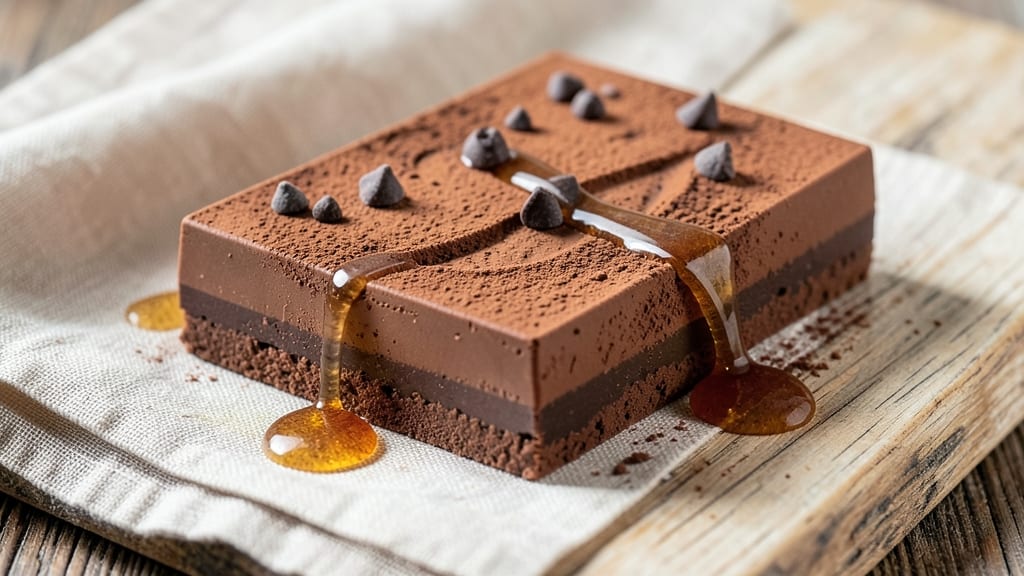
This cacao chocolate bar recipe delivers a sophisticated blend of deep cocoa richness and subtle coffee notes, creating a dessert that’s both indulgent and unexpectedly complex. ✨ The secret lies in balancing high-quality cacao with just the right amount of espresso powder, which enhances the chocolate’s natural depth without overpowering it.
Perfect for satisfying cravings or impressing guests, these bars combine a satisfying crunch with velvety cocoa rivers that melt on the tongue.
What sets these chocolate bars apart is their versatility—you can customize them with optional ingredients like toasted nuts for texture, sea salt for contrast, or even a pinch of chili powder for a hint of warmth.
The process is surprisingly simple: melt the chocolate, mix in your chosen enhancements, and pour into a lined pan for a smooth, glossy finish. No tempering required, making this recipe beginner-friendly yet impressive.
The result is a batch of chocolate bars that look and taste like they came from a specialty chocolatier. The coffee-infused cacao base creates a sophisticated flavor profile, while the optional mix-ins add layers of texture and complexity.
These bars are ideal for gifting, holiday treats, or simply enjoying a moment of pure indulgence without guilt.
Store them in an airtight container at room temperature for up to two weeks, or refrigerate for longer shelf life. The combination of rich cocoa, subtle coffee, and customizable toppings makes these chocolate bars a standout dessert that’s as easy to make as it is delicious to eat.
Ingredients for cacao chocolate bar
Twelve ingredients crafting a luxurious cacao-chocolate experience with coffee depth and velvety cocoa rivers.
| Ingredient | Amount | Notes |
|---|---|---|
| Unsweetened Cacao Powder 🍫 | 1 cup | High-quality, Dutch-processed preferred |
| Extra-Dark Chocolate Chips 🍫 | 1 ½ cups | 70% cocoa or higher, vegan |
| Espresso Powder ☕ | 2 tbsp | Finely ground, high-quality |
| Coconut Oil 🥥 | ½ cup | Unrefined, solid at room temp |
| Maple Syrup 🍁 | ¼ cup | Grade B for depth of flavor |
| Vanilla Extract 🌿 | 1 tsp | Pure, Madagascar bourbon preferred |
| Sea Salt 🧂 | ½ tsp | Fine grain, Maldon preferred |
| Toasted Almonds 🌰 | ½ cup | Chopped, optional for texture |
| Toasted Hazelnuts 🌰 | ½ cup | Chopped, optional for texture |
| Chili Powder 🌶️ | ¼ tsp | Optional, for subtle heat |
| Dark Chocolate Glaze 🍫 | ½ cup | Optional, for decorative rivers |
| Coconut Oil 🥥 | 1 tbsp | For glaze, if using |
The foundation begins with high-quality cacao powder—Valrhona or Cacao Barry deliver unmatched depth. Espresso powder is non-negotiable for authentic coffee notes; Starbucks or Lavazza brands offer consistent quality. For chocolate chips, Enjoy Life or Alter Eco provide reliable vegan options with intense cocoa flavor. Coconut oil should be unrefined for its natural coconut aroma, while Grade B maple syrup adds subtle earthiness without overpowering. Maldon sea salt creates delicate contrast, and Madagascar vanilla offers floral complexity that pairs beautifully with the cacao. Toasted nuts should be lightly browned for optimal flavor—Trader Joe's pre-toasted varieties save time without sacrificing quality.
No espresso powder? Instant espresso granules work at half the amount, but the texture won't be as fine. Substitute dark roast coffee powder if available, though it may impart grainier texture. Maple syrup can be swapped for agave nectar (1:1 ratio), though it lacks maple's depth. Almond butter at 2 tbsp can replace nuts for a smoother texture, but the crunch is irreplaceable. Chili powder is optional but enhances the coffee-chocolate pairing beautifully—Penzeys offers excellent quality. For the glaze, vegan dark chocolate bars (70% cocoa) melted with coconut oil create stunning rivers. Enjoy Life or Hu Kitchen brands melt smoothly without seizing.
Store finished bars in an airtight container at room temperature for 1-2 weeks—the coconut oil keeps them stable. For longer storage, refrigerate for up to 3 months or freeze for 6 months. The glaze hardens at room temperature, so reheat gently before serving. Portion into 12 equal bars (2x6) for perfect individual servings. The bars develop deeper flavor over 24 hours, so patience rewards with richer cocoa notes. Double-wrap in parchment and foil for gifting—ideal for holiday presents or corporate treats.
Why You'll Love This Recipe
- No-Mess Mixing: I swear by this recipe because it’s just stir and pour—no fancy equipment, no stress. You melt coconut oil, whisk in cacao and espresso powder, then fold in chocolate chips and maple syrup until it’s smooth. Five minutes max, and zero cleanup that’ll make you question your life choices.
- Espresso Kick: Between us, the espresso powder is the secret weapon. It cuts through the richness of the cacao and chocolate chips, giving these bars a deep, slightly bitter edge that feels luxurious without being cloying. Honestly, it’s the kind of flavor that makes me forget I’m eating dessert at 3 PM.
- Gift-Worthy Bars: These aren’t just for snacking—they’re presentable. Wrap them in parchment, tie with twine, and boom: instant hostess gift for birthdays, holidays, or just because. My neighbor’s kids still ask for them months later, and I’ve never spent less than $10 on packaging.
- Budget Bliss: Unsweetened cacao and dark chocolate chips are dirt cheap in bulk, and coconut oil lasts forever. A batch of these bars costs me pennies compared to store-bought treats, and I control the sweetness—no weird additives, just pure, crave-worthy chocolate. Plus, they keep for weeks in the fridge, so I’m not tempted to buy overpriced snacks.
Step-by-step instructions for coffee-infused cacao chocolate bars
Here's how to craft rich, coffee-kissed chocolate bars with molten cocoa rivers and nutty crunch.
👨🍳 Step 1: Melt the Chocolate Base
In a heatproof bowl set over a saucepan of simmering water (double boiler), combine the 1.5 cups extra-dark chocolate chips, 0.5 cup coconut oil, and 2 tbsp espresso powder. Stir gently until the chocolate reaches 110°F and becomes completely smooth—about 5-7 minutes. The mixture should look glossy with no visible chips remaining.
Remove from heat immediately to prevent overheating. Stir in the 0.25 cup maple syrup, 1 tsp vanilla extract, and 0.5 tsp sea salt until fully incorporated. This creates the deep, complex flavor foundation that balances the bitterness of cacao with coffee's intensity.
🥘 Step 2: Incorporate Dry Ingredients and Nuts
In a separate bowl, whisk together the 1 cup unsweetened cacao powder and 0.25 tsp chili powder (if using) to eliminate any lumps. Gradually fold this mixture into the melted chocolate base, alternating with 0.5 cup toasted almonds and 0.5 cup toasted hazelnuts. Use a silicone spatula to ensure even distribution—you want visible nut pieces throughout for texture contrast.
Work quickly but thoroughly. The mixture should be thick but spreadable, like warm peanut butter. If it's too stiff, gently warm it for 10 seconds in the microwave to restore workability. This step builds the signature crunch and depth of flavor that distinguishes these bars from standard chocolate.
🍳 Step 3: Press into Pan and Chill
Line a 9x13-inch baking pan with parchment paper, leaving overhang on all sides for easy removal. Spread the chocolate mixture evenly using an offset spatula, pressing firmly to create a smooth, compact surface. Tap the pan gently on the countertop 3-4 times to eliminate any air bubbles that might form.
Refrigerate for 2 hours or freeze for 1 hour until completely firm. The bars should hold their shape when gently pressed with a finger. This chilling step is crucial—it allows the coconut oil to solidify properly, creating clean breaks when cutting. Don't skip it or you'll end up with greasy, uneven bars.
🔪 Step 4: Create Cocoa Rivers and Glaze
Remove the pan from the fridge and carefully transfer the chocolate slab onto a cutting board. Using a sharp knife, score the chocolate into 12 equal squares (about 2.5x2.5 inches each). In a small bowl, melt the 0.5 cup dark chocolate glaze and 1 tbsp coconut oil together in 30-second intervals in the microwave, stirring between each interval until smooth.
Drizzle the melted glaze in thin lines across the chocolate squares, working quickly before it sets. Return to the fridge for 15 minutes to allow the glaze to firm up. This creates those signature "rivers" of molten chocolate that make these bars visually stunning and add an extra layer of richness.
⏰ Step 5: Cut and Store for Perfect Texture
Lift the chocolate slab from the parchment and cut along the scored lines. The bars should release cleanly with minimal sticking. For the best texture, let them sit at room temperature for 10 minutes before serving—this allows the coconut oil to soften slightly, creating that perfect balance between firmness and melt-in-your-mouth smoothness.
Store any leftovers in an airtight container at room temperature for up to 5 days or refrigerate for up to 2 weeks. For maximum freshness, wrap individual bars in parchment paper before storing. The coffee notes will mellow slightly over time, but the chocolate's depth will only intensify.
Pro Tips For Making Cacao Chocolate Bar
- Melt Chocolate Slowly: Mix the extra-dark chocolate chips and coconut oil in a heatproof bowl over barely simmering water—not direct heat. I learned this the hard way: high heat seizes chocolate, and you’re left with a grainy mess instead of a silky base. Stir every 30 seconds until smooth, then remove from heat immediately.
- Sift the Cacao: Skip the clumps—sift the unsweetened cacao powder before adding it to the mix. I used to just dump it in, and the bars always turned out dense and uneven. A fine sift also helps the espresso powder distribute evenly, so every bite has that deep, balanced flavor.
- Balance the Espresso: Start with half the espresso powder called for, taste, then add more if needed. Too much turns bitter fast, and you’ll regret it. I was skeptical until I tried it—now I always keep a small jar of espresso powder on hand to tweak the intensity.
- Press Firmly, Then Chill: Use a glass or metal plate to press the mixture into the mold—it needs pressure to set properly. After shaping, pop it in the freezer for 10 minutes before slicing. This prevents crumbling and makes clean cuts. (Yes, even if you’re impatient like me.)
Pro cooking tips for this dish
Double Boiler Mastery
Melting chocolate requires precision—never use direct heat, as it can cause burning or seizing. I use a double boiler with a heatproof bowl placed over simmering (not boiling) water. Maintain the temperature between 100-110°F to avoid overheating the chocolate.
If your kitchen lacks a double boiler, a microwave-safe bowl with 20-second intervals on 50% power works well. Stir every 10 seconds to prevent hot spots. 🌡️
Cocoa Powder Tricks
Whisk your unsweetened cacao powder with chili powder (if using) before mixing to eliminate lumps. Sift it through a fine-mesh sieve for ultra-smooth incorporation. When folding into melted chocolate, use a silicone spatula to scrape the bowl thoroughly—leftover powder on the sides creates dry spots.
For extra richness, add 1 tsp instant coffee granules with the espresso powder to deepen the coffee flavor. ✨
Nut Toasting Shortcut
Toast your nuts in a 350°F oven for 8-10 minutes until fragrant, then chop while still warm. No oven? Use a dry skillet over medium heat for 3-4 minutes, shaking constantly.
For a nut-free version, replace with 2 tbsp almond butter or 1 tbsp tahini—just fold it in last to maintain texture. Always chop nuts coarsely (about ¼ inch) for visible crunch without overpowering the chocolate. 🌰
Pan Prep Secrets
Line your 9x13-inch pan with parchment paper, but leave 1-inch overhang on all sides for easy removal. Lightly spray the parchment with coconut oil before spreading the mixture—this prevents sticking and makes cutting cleaner.
For extra gloss, press the chocolate with a wet offset spatula after spreading. Tap the pan 3-4 times on the counter to release air bubbles that could weaken the slab. ⚡
Glaze Timing Tips
Melt your dark chocolate glaze in 30-second bursts to avoid overheating—chocolate burns faster than you think! Work quickly when drizzling: use a piping bag with a small tip for precise lines, or a spoon for freehand rivers.
Return to the fridge immediately after drizzling to set the glaze before it melts into the bars. For extra shine, brush the finished bars with a tiny bit of coconut oil using a clean pastry brush. 💫
Cutting Like a Pro
Score your chocolate slab before cutting—press a sharp knife all the way through the parchment and chocolate in one motion. For clean breaks, dip the knife in hot water, wipe dry, and cut again.
Let bars sit at room temperature for 10 minutes before serving—the coconut oil softens slightly, creating that perfect snap when biting. Store cut bars in an airtight container with parchment between layers to prevent sticking. 🔪
Nutrition facts
Frequently asked questions
Can I make this recipe without nuts?
For a nut-free version, simply omit the almonds and hazelnuts. Replace them with 2 tablespoons almond butter or 1 tablespoon tahini for creaminess, or skip entirely for a smoother texture. The recipe will still hold together beautifully without nuts.
Why does my chocolate mixture look grainy?
Graininess usually means the chocolate overheated or had moisture introduced. Always use a double boiler and keep temps below 110°F. If it happens, whisk in 1 teaspoon coconut oil to smooth it out. Also ensure your cacao powder is lump-free by sifting it first.
How do I get the cocoa rivers to look professional?
Use a piping bag with a small tip for precise lines, or a spoon for freehand drizzles. Work quickly and return the bars to the fridge immediately after drizzling. For extra shine, brush finished bars with a tiny bit of melted coconut oil using a clean pastry brush.
Can I use regular cocoa powder instead of cacao powder?
No, they're different! Cacao powder is pure, fat-rich, and creates a richer texture. Regular cocoa powder (like Hershey's) contains added sugars and fillers that alter the flavor and melt. For best results, stick with high-quality unsweetened cacao powder.
How do I store these bars for maximum freshness?
Store in an airtight container at room temperature for up to 5 days, or refrigerate for 2 weeks. For longer storage, freeze for 3 months. Always wrap individual bars in parchment paper before storing to prevent sticking. The bars develop deeper flavor over time!