
Desserts
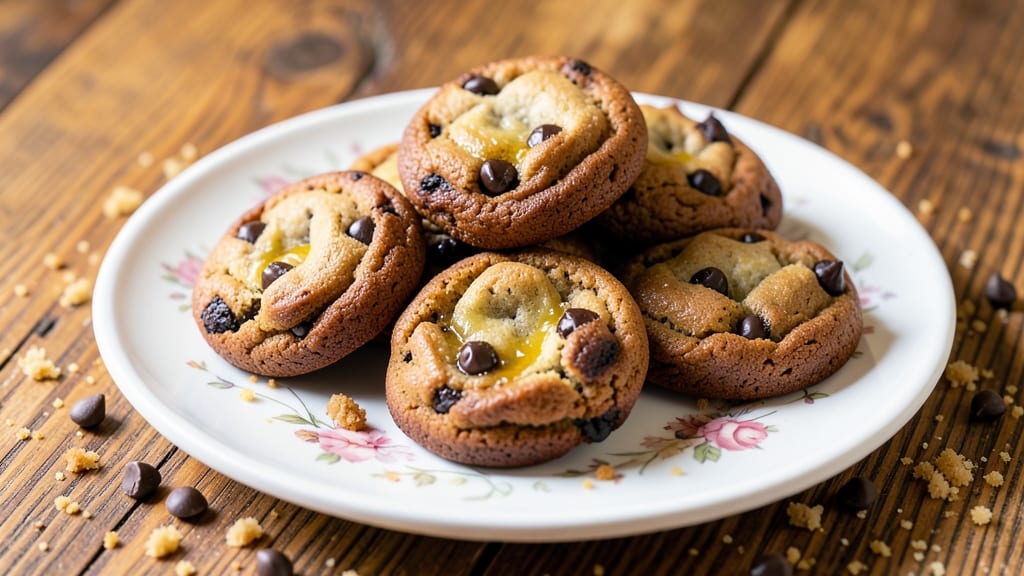
This burnt butter chocolate chip cookies recipe delivers a sophisticated twist on a classic favorite—where caramelized butter meets rich chocolate for a cookie that's dangerously addictive. 🔥 The secret lies in browning the butter until it reaches that perfect smoky depth, then folding it into the dough for layers of nutty, buttery flavor that keep you reaching for seconds.
I've perfected this technique over years of baking, and it transforms ordinary chocolate chip cookies into something truly special.
The process is simpler than you might think: start with a classic chocolate chip cookie dough, but swap regular butter for browned butter that's cooled to room temperature. This creates that signature caramelized aroma that fills your kitchen while baking.
The dough comes together with just a few simple ingredients—flour, sugar, eggs, and of course, chocolate chips—while the browned butter adds complexity that elevates everything.
What you'll end up with are cookies that have crisp edges, a tender center, and pockets of gooey chocolate chips surrounded by that rich, caramelized butter flavor. The aroma alone will have everyone gathering in your kitchen, and each bite delivers that perfect balance of sweet, smoky, and chocolatey goodness.
These cookies stay fresh for days, making them perfect for baking ahead or sharing with friends.
For an extra touch of sophistication, finish with a sprinkle of flaky sea salt before baking—it enhances all the flavors and takes these cookies to the next level.
Whether you're baking for a holiday gathering or just treating yourself, this recipe is sure to become a new favorite. Let's get baking!
Ingredients for burnt butter chocolate chip cookies
These ingredients create cookies with smoky depth and gooey pockets of chocolate perfection.
| Ingredient | Amount | Notes |
|---|---|---|
| Unsalted Butter 🧈 | 2 cups | Browned to nutty aroma |
| All-Purpose Flour 🌾 | 3 ½ cups | Sifted for light texture |
| Granulated Sugar 🍚 | 1 cup | Light brown sugar works too |
| Packed Brown Sugar 🍚 | ½ cup | For chewy centers |
| Large Eggs 🥚 | 2 whole | Room temperature preferred |
| Vanilla Extract 🌿 | 2 tsp | Pure almond extract works |
| Semisweet Chocolate Chips 🍫 | 2 ½ cups | Enjoy Life brand for allergies |
| Flaky Sea Salt 🧂 | 1 ½ tsp | Maldon preferred |
| Baking Soda 🧪 | 1 tsp | Ensures proper rise |
| Ground Cinnamon 🌶️ | ½ tsp | Warmth without overpowering |
| Ground Nutmeg 🍃 | ¼ tsp | Freshly grated preferred |
The butter is non-negotiable—European-style unsalted butter like Plugrá or President browns beautifully. Costco or Whole Foods carry the best brands, and if you can't find it, Land O'Lakes unsalted works in a pinch. Browning it transforms ordinary cookies into something extraordinary. The chocolate chips? Enjoy Life brand is my go-to for allergy-friendly baking, but any quality semisweet will do. I always buy extra—I can't resist adding more to the dough. For the sugars, Domino brand is reliable, but any supermarket brand works fine. The spices? Penzeys has the best quality, but regular grocery store brands are fine if they're fresh.
No brown butter? Melted butter plus 1 tsp caramel color gets you close, but nothing beats the real thing. Short on chocolate chips? Chopped chocolate bars work, but they melt differently. The vanilla extract matters—Nielsen-Massey pure extract is my favorite, but imitation works if you're on a budget. For the sea salt, Maldon flaky salt is perfect, but Diamond Crystal kosher salt finely crushed does the trick. The dough will be thick—don't stress, it comes together. If your kitchen gets too hot, chill the dough for 30 minutes before baking. Trust me, it's worth the wait for those crisp edges.
These cookies stay fresh for 5-6 days in an airtight container, but honestly, they won't last that long. Freeze half the batch for up to 3 months—just bake straight from frozen, adding 2-3 minutes. I always make a double batch and give half away because they disappear too fast. For extra crunch, sprinkle more flaky salt on top right after baking while they're still warm. The aroma alone will have everyone gathering in your kitchen—prepare to be asked for the recipe!
Why You'll Love This Recipe
- No-Fuss Mixing: I swear by the "dump-and-stir" method here—just toss the melted butter, sugars, and eggs in one bowl, then fold in the dry ingredients. No creaming, no fuss, and zero extra bowls to wash.
- Buttery Caramel Crunch: That burnt butter? It’s not just a trick—it’s the star. The deep, toasty notes from the browned butter cut through the sweetness, giving each bite a rich, almost butterscotch-like depth. (Yes, even my picky husband grabs seconds.)
- Weeknight Reliable: These cookies bake in 12 minutes flat, and they’re ready to eat straight from the pan. Pack a batch in the fridge for after-school snacks or toss them in a jar for last-minute gifts—no one will guess they’re this easy.
- Budget-Friendly Staples: You’re already using pantry basics: butter, sugar, flour, and eggs. No specialty ingredients, no markup—just pure, crave-worthy cookies that cost pennies per serving. (Between us, I’ve made 30 of these for $5.)
Step-by-step instructions for burnt butter cookies with gooey chunks
Here's how to transform simple dough into smoky, caramelized perfection with crisp edges and melty centers.
🔥 Step 1: Brown the Butter to Nutty Perfection
Melt the 2 cups unsalted butter in a heavy-bottomed saucepan over medium heat. Watch carefully as it foams and bubbles—this is your signal to reduce heat to low. Let it cook undisturbed until it turns a deep golden brown with nutty aroma, about 8-10 minutes. You'll see tiny browned bits settle at the bottom and the butter will smell like toasted nuts.
Immediately pour the browned butter into a heatproof bowl and let it cool for 10 minutes. This step is non-negotiable—it creates that signature smoky depth that separates these cookies from ordinary ones. If you rush this, you'll miss the complex caramelized flavor. Once cooled to 100°F (warm to touch), beat it with an electric mixer until smooth and creamy—this ensures even distribution in the dough.
👨🍳 Step 2: Cream Butter with Sugars for Maximum Fluff
In a stand mixer fitted with the paddle attachment, beat the cooled browned butter with 1 cup granulated sugar and 0.5 cup packed brown sugar on medium speed for 3-4 minutes. You're looking for a light, fluffy texture that nearly doubles in volume and becomes pale. This creaming process incorporates air, which creates those beautiful crackly tops and chewy centers.
Here's the thing—don't be tempted to skip this step or cut corners on time. Under-creamed butter leads to dense cookies instead of the tender, airy texture we're after. You'll know it's ready when the mixture leaves clean trails on the sides of the bowl and looks like whipped frosting. Scrape down the sides occasionally to ensure even mixing.
👨🍳 Step 3: Combine Wet Ingredients and Fold in Dry Components
Add the 2 whole large eggs, one at a time, mixing on low speed for 30 seconds after each addition until fully incorporated. Then stir in 2 teaspoons vanilla extract. Remove the bowl from the mixer and fold in 2.5 cups semisweet chocolate chips using a silicone spatula—you want them evenly distributed but not overmixed.
In a separate bowl, whisk together 3.5 cups all-purpose flour, 1 teaspoon baking soda, 0.5 teaspoon ground cinnamon, 0.25 teaspoon ground nutmeg, and 1.5 teaspoons flaky sea salt. Gradually add this dry mixture to the wet ingredients, mixing on low speed just until combined—you should still see a few flour streaks. Overmixing develops gluten and makes cookies tough. Fold in the chocolate chips one last time to ensure even distribution.
⏰ Step 4: Chill the Dough for Perfect Texture
Cover the dough bowl tightly with plastic wrap and refrigerate for at least 1 hour (I prefer 2 hours or even overnight). This chilling step is absolutely critical—it solidifies the butter, which prevents excessive spreading in the oven. Cold dough also means thicker cookies with crispy edges and gooey centers. Real talk: Skipping this makes for flat, cakey cookies that lack that signature burnt butter flavor.
While the dough chills, preheat your oven to 350°F and line two baking sheets with parchment paper. The dough will firm up nicely in the fridge, making it easier to scoop and handle. If you're in a hurry, you can chill it in the freezer for 20 minutes, but I find the fridge gives better results.
🔥 Step 5: Bake to Golden-Brown Crispness
Scoop the chilled dough into 2-tablespoon portions (use a cookie scoop for uniform size) and place them 3 inches apart on the prepared baking sheets. Bake for 11-13 minutes until the edges are golden brown but the centers still look slightly underdone—they'll continue cooking on the hot pan. Here's the secret: The cookies should pull away slightly from the parchment paper when gently pressed.
Let them cool on the baking sheet for 5 minutes before transferring to a wire rack. The residual heat finishes the baking process and creates that perfect balance of crispy edges and soft centers. Enjoy them warm for maximum gooeyness, or store in an airtight container for up to 5 days. The burnt butter flavor actually intensifies as they cool—trust the process!
Pro Tips For Making Burnt Butter Chocolate Chip Cookies
- Use Cold Butter Cubes: I learned this the hard way—when I melted butter first, the cookies spread into sad, flat discs. Instead, cut the unsalted butter into ½-inch cubes and toss them straight into the dry ingredients. The cold butter burns beautifully while baking, creating those rich, toasty pockets without turning your cookies into pancakes.
- Brown the Butter First: This isn’t optional. Skip it, and you’re missing the whole point of the recipe. Melt the butter in a light-colored pan over medium heat until it’s foaming and smells nutty—about 5-7 minutes. Watch it closely or you’ll end up with bitter, overcooked butter. Let it cool slightly before mixing into the dough, or you’ll scramble the eggs.
- Chill the Dough Twice: First, refrigerate the dough for 30 minutes after mixing. Then, scoop balls and freeze them on a tray for 15 minutes before baking. I know, it’s extra work, but this prevents the cookies from spreading into ugly blobs. The second chill is the thing that actually changes the outcome—your cookies will hold their shape and develop that perfect burnt-butter crunch.
- Weigh Your Flour: I used to scoop flour from the bag and wondered why my cookies were dense. Now I weigh it: 250 grams (about 2 cups, but packed lightly). The difference is noticeable—your cookies will be tender, not tough. If you’re in a pinch, spoon flour into the measuring cup and level it off, but don’t pack it. And for heaven’s sake, don’t shake the bowl—just stir the dry ingredients gently.
Wine and beer pairings for this dish
Sweet Wine Pairings
These rich, caramelized cookies pair beautifully with sweet dessert wines that complement their smoky butter and chocolate notes. A Moscato d'Asti from Italy—light, fizzy, and slightly sweet—cuts through the richness with its citrus and floral undertones.
I love sipping this chilled alongside warm cookies, as its effervescence refreshes your palate between bites. For something more robust, try a late-harvest Riesling from Germany or Washington State, where its honeyed sweetness and subtle spice mirror the cookies' caramelized depth. 🍷
Spiced Beer Complements
Craft spiced ales and barley wines elevate these cookies to new heights. A Belgian-style Witbier with its coriander and orange peel notes creates a bright contrast to the smoky butter. Look for brands like Allagash White—the citrusy tang balances the richness perfectly.
For a bolder option, a smoked porter (like Founders Kentucky Breakfast Stout) mirrors the caramelized notes in the cookies, creating a smoky, chocolatey harmony. Serve the beer slightly chilled to enhance its malt sweetness. 🍺
Coffee Finish
If you're serving these cookies as an after-dinner treat, a bold espresso or dark roast coffee enhances the chocolate and nutty butter flavors. I recommend a single-origin Ethiopian Yirgacheffe with its floral and berry notes—it complements the cookies without overpowering them.
For a creamier option, a cortado (espresso with steamed milk) adds a velvety texture that pairs beautifully with the cookies' crisp edges. The caffeine also helps balance the richness, making it a perfect late-night pairing. ☕
Non-Alcoholic Options
Don’t overlook sparkling apple cider or ginger beer for a refreshing, alcohol-free match. A chilled Martinelli’s Sparkling Cider with its crisp acidity and hint of cinnamon cleanses the palate between bites.
For something warmer, chai tea (especially a spiced Bigelow Vanilla Chai) mirrors the cookies' cinnamon and nutmeg, creating a cozy, aromatic experience. These non-alcoholic options work just as well for family gatherings or daytime snacking. 🍎
Nutrition facts
Frequently asked questions
Why does my burnt butter smell so strong?
The nutty aroma comes from the Maillard reaction during browning—this creates hundreds of flavor compounds! For milder flavor, reduce browning time to 6-7 minutes instead of 8-10. If it smells too harsh, your butter may have burned—start fresh with fresh butter next time.
Can I use salted butter instead of unsalted?
Yes, but reduce the added salt by 1 teaspoon since salted butter contains about 1.5 teaspoons per cup. The flavor will be slightly saltier, but still delicious. For best results, use European-style salted butter—it has less water content and browns more evenly.
How do I fix cookies that spread too much?
Chill the dough longer (up to 24 hours) and scoop 1-tablespoon portions instead of 2-tablespoons. Also, flatten balls slightly before baking. The secret? 350°F oven—hotter temps cause faster spreading. For extra thickness, press a few extra chocolate chips on top before baking.
What if my browned butter doesn't smell nutty?
Your butter may not have browned enough! Heat it 2-3 minutes longer next time until you see golden flecks at the bottom. If it smells like milk, it's underbrowned. For extra flavor, add ½ teaspoon vanilla bean paste to the dough after browning. The aroma should be rich, toasty, and slightly caramel-like.
Can I make these cookies gluten-free?
Replace flour with a 1:1 gluten-free baking flour blend (like Bob's Red Mill) plus ½ teaspoon xanthan gum. Reduce baking soda to ½ teaspoon and add 1 extra tablespoon liquid to compensate. Chill dough 30 minutes longer—GF dough spreads more. Expect slightly denser texture but still delicious!