
Desserts
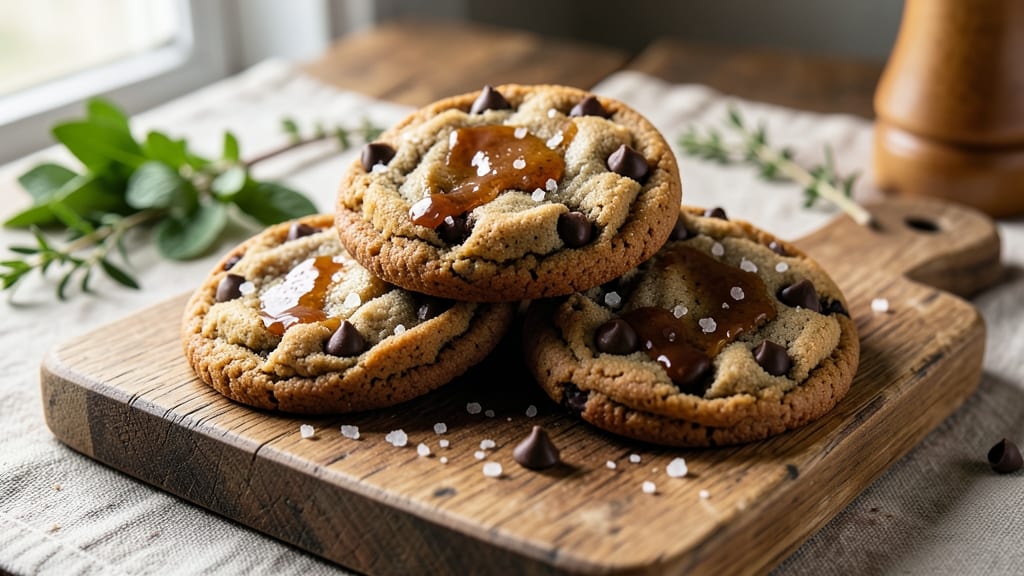
This brown butter sea salt chocolate chip cookie recipe transforms ordinary cookies into a rich, nutty masterpiece with every bite. The caramelized depth of brown butter and the sharp contrast of flaky sea salt elevate classic chocolate chip cookies to a whole new level.
I've perfected the balance between chewy centers and crisp edges, ensuring each cookie delivers maximum flavor in every bite.
The secret to these cookies lies in the brown butter—its nutty, caramelized aroma infuses the dough with complex flavor that no regular butter can match. While the cookies bake, the sea salt crystals sprinkled on top create a satisfying crunch and enhance the sweetness of the chocolate chips.
This isn't just a cookie recipe; it's an experience that turns a simple dessert into something extraordinary.
With just 10 minutes of prep and 12 minutes in the oven, you'll have cookies that look like they came from a high-end bakery. The dough is simple to mix, but the flavor transformation during baking is what makes these cookies truly special.
Perfect for holiday gatherings, weekend treats, or when you want to impress with minimal effort.
Once you try these brown butter sea salt chocolate chip cookies, you'll never go back to regular chocolate chip cookies again. The combination of rich brown butter, sweet chocolate chips, and salty flakes creates a flavor profile that's impossible to resist. Let's get baking!
Ingredients for brown butter sea salt chocolate chip cookie
Ten simple ingredients transform into cookies with nutty depth and salty crunch.
| Ingredient | Amount | Notes |
|---|---|---|
| Unsalted Butter 🧈 | 1 cup | Browned for nutty flavor |
| Granulated Sugar 🍚 | ¾ cup | Light brown sugar works too |
| Packed Brown Sugar 🍚 | ½ cup | For chewy texture |
| Large Eggs 🥚 | 2 whole | Room temperature preferred |
| Vanilla Extract 🌿 | 2 tsp | Pure vanilla for best flavor |
| All-Purpose Flour 🌾 | 2 ½ cups | Sifted for light texture |
| Baking Soda 🧂 | ½ tsp | For lift and flavor |
| Sea Salt 🧂 | 1 tsp | Fine flaky salt preferred |
| Chocolate Chips 🍫 | 2 cups | Semi-sweet preferred |
| Flaky Sea Salt 🧂 | 2 tbsp | For final sprinkle |
The butter is non-negotiable here—unsalted so you control the saltiness, and browned for that caramelized magic. Grab a high-quality brand like Land O'Lakes or Plugrá for the best flavor. If you're nervous about browning butter, use a light-colored pan so you can see when it turns golden. The sugar combo (white + brown) gives you both crisp edges and chewy centers. I always use Domino or Gold Medal flour—they're reliable and affordable. For the sea salt, Maldon or Jacobsen are worth the splurge, but any flaky salt will work.
No vanilla extract? Almond extract at half the amount gives a similar depth. Short on brown sugar? Substitute white sugar plus 1 tsp molasses for that caramel note. Prefer white chocolate chips? Use them, but add an extra tbsp of chocolate for balance. The baking soda is crucial—never skip it or your cookies won't rise properly. For the chocolate chips, Ghirardelli or Nestlé Toll House are my go-tos, but any semi-sweet will do. If you're feeling fancy, toss in a handful of toasted pecans for extra crunch.
Brown butter can be made ahead and stored in the fridge for up to 1 week—just reheat gently before using. The dough keeps for 2 days wrapped in plastic, but fresh is always better. After baking, let cookies cool on the sheet for 5 minutes before transferring—they'll crisp up as they cool. Store in an airtight container for 5 days or freeze portions for 3 months. Pro tip: Sprinkle extra sea salt on warm cookies for maximum flavor impact.
Why You'll Love This Recipe
- No-Fuss Mixing: I swear by the "dump-and-stir" method here—just toss in the butter, sugars, eggs, and vanilla, then fold in the chocolate. The dough comes together in under five minutes, no food processor or over-kneading required.
- Nutty, Salty Magic: That brown butter? It’s the star—rich, toasty, with a hint of caramel that melts into the dough. Toss in flaky sea salt, and suddenly you’ve got cookies with layers of flavor that taste like a gourmet bakery’s secret.
- Party-Proof Portion: These are my go-to for holiday cookie platters, potlucks, or even a "I need dessert now" moment. They freeze beautifully, so I can bake a batch and pull them out whenever—no last-minute stress.
- Budget-Friendly Luxury: Unsalted butter and basic pantry staples mean this recipe won’t break the bank, but the taste? It’s anything but cheap. A single batch stretches to gifts, snacks, and midnight cravings without guilt.
Step-by-step instructions for brown butter sea salt chocolate chip cookies
Here's how to make cookies with rich brown butter flavor and perfect sea salt crunch—every bite delivers.
Brown the Butter for Nutty Depth
Melt the 1 cup unsalted butter in a light-colored saucepan over medium heat. Watch carefully as it foams and bubbles—this is when the magic happens. The butter will transform from pale yellow to golden brown with nutty aroma, about 5-7 minutes.
Here's the thing—don't walk away. Brown butter burns quickly once it reaches the right stage. You'll know it's perfect when it smells like caramelized popcorn and toffee. Immediately pour the browned butter into a heatproof bowl and let it cool for 10 minutes. This cooling step prevents the butter from turning the dough greasy.
Cream Butter with Sugars for Light Texture
Once the butter has cooled slightly (it should be warm but not melted), beat it with the 0.75 cup granulated sugar and 0.5 cup packed brown sugar in a stand mixer fitted with the paddle attachment. Mix on medium speed for 3-4 minutes until light and fluffy—you'll see the mixture nearly double in volume and turn pale.
This creaming process incorporates air, which creates those beautiful crackly tops and helps the cookies spread just enough. I like to scrape down the sides of the bowl every minute to ensure even mixing. If your mixture looks grainy, that's normal—it'll smooth out as you add the eggs.
Add Eggs and Vanilla for Moisture
Add the 2 whole large eggs, one at a time, mixing on low speed for 30 seconds after each addition. Then stir in the 2 teaspoons vanilla extract. The mixture will look slightly curdled at first, but don't worry—it will come together when you add the dry ingredients.
I always use room-temperature eggs for better emulsification. If your eggs are straight from the fridge, let them sit in warm water for 5 minutes before using. This ensures the dough comes together smoothly and the cookies bake evenly.
Combine Dry Ingredients and Chocolate
In a separate bowl, whisk together the 2.5 cups all-purpose flour, 0.5 teaspoon baking soda, and 1 teaspoon sea salt. Gradually add this mixture to the wet ingredients, mixing on low speed for 30-45 seconds until just combined. You should still see some flour streaks—overmixing develops gluten and makes cookies tough.
Remove the bowl from the mixer and gently fold in the 2 cups chocolate chips by hand using a silicone spatula. I use a mix of semi-sweet and dark chocolate chips for depth of flavor. Make sure they're evenly distributed throughout the dough. Cover the bowl with plastic wrap and refrigerate for at least 30 minutes—this chilling step is crucial.
Bake to Golden Perfection with Sea Salt Crunch
Preheat your oven to 350°F and line two baking sheets with parchment paper. Scoop the chilled dough into 2-tablespoon portions using a cookie scoop and place them 3 inches apart on the prepared sheets. Sprinkle each cookie with a pinch of the 2 tablespoons flaky sea salt before baking.
Bake for 11-13 minutes until the edges are golden brown but the centers still look slightly underdone. They'll continue cooking on the hot pan after you remove them from the oven. Let them cool on the baking sheet for 5 minutes before transferring to a wire rack. Enjoy them warm for the ultimate experience!
Pro Tips For Making Brown Butter Sea Salt Chocolate Chip Cookie
- STOP WHEN IT’S GOLDEN: Brown butter should smell like a movie theater—not burnt popcorn. Watch it like a hawk, swirling the pan constantly, and pull it at 350°F (175°C), just when the foam subsides. Let it cool 5 minutes before adding wet ingredients, or you’ll scramble your eggs.
- SALT THE BUTTER FIRST: Toss a pinch (¼ tsp) of flaky sea salt into the melted brown butter before mixing with sugars. The salt dissolves into the fat, giving every bite that buttery depth without over-salting the dough later. Trust me, you’ll taste the difference—it’s not just about the chips.
- CHILL THE DOUGH LONGER: Skip the 30-minute rest and go for 48 hours in the fridge. The gluten relaxes, the flavors meld, and you’ll avoid flat, tough cookies. Roll them into balls right before baking—cold dough holds shape better, and the edges stay crisp.
- USE ROOM-TEMP EGG: Cold eggs from the fridge? Whisk them first to room temp, or they’ll cook unevenly in the dough. I learned this the hard way—lumpy, undercooked centers in an otherwise perfect batch. A quick 5-minute sit in warm water fixes it if you’re in a rush.
Essential equipment for perfect results
Must-Have Mixer
Your stand mixer is the workhorse of this recipe. I swear by my KitchenAid Artisan Series with the paddle attachment—it handles the butter and sugar creaming like a dream. For budget-friendly options, the Cuisinart SM-50BC delivers great results.
The key is the paddle attachment—it incorporates air better than beaters for that light, crackly cookie texture. If you don't have a mixer, use a hand mixer for at least 5 minutes of vigorous beating. 💛
Precision Measuring Tools
Accurate measurements make all the difference with cookies. Invest in a digital kitchen scale for the dry ingredients like flour and sugar—I use my OXO Good Grips scale for precision. For liquid measurements, a clear glass measuring cup with markings works best.
The brown sugar needs to be packed firmly (use the scale's tare function to avoid spills). Pro tip: Use a cookie scoop (like the OXO Good Grips 2-tbsp scoop) for even portions—2 tablespoons each will give you perfect-sized cookies.
Browning Butter Pan
Never brown butter in a nonstick pan—it's a fire hazard. Use a light-colored stainless steel saucepan (I love my All-Clad Stainless) so you can see the color changes clearly. The pan should be medium-sized—too large means the butter spreads too thin and burns.
Keep a wooden spoon nearby to stir occasionally and prevent hot spots. For extra safety, place the pan on a silicon mat to catch any potential splatters. 🔥
Baking Essentials
Your oven thermometer is non-negotiable—I use the ThermoWorks Oven Thermometer to ensure accurate 350°F readings. Pair it with two heavy-duty baking sheets (I prefer Nordic Ware Natural Aluminum) for even heat distribution. Line them with parchment paper (like If You Care) to prevent sticking.
For portioning, a cookie scoop (as mentioned earlier) works best, but a large spoon in a pinch will do. Don't forget flaky sea salt—Maldon or Jacobsen are my top picks for that perfect crunch.
Chilling Tools
Chilling the dough is crucial for flavor development and shape retention. I use clear plastic wrap (like Glad Press'n Seal) to cover the bowl completely, pressing it directly against the dough to prevent a skin from forming.
For longer storage, a wide-mouth glass container (like Pyrex) works well for up to 2 days in the fridge. If you're making dough ahead, freeze portions in quart-sized freezer bags—thaw in the fridge overnight before baking. 💡
Optional Upgrades
For the ultimate cookie experience, consider a cookie press (like OXO Good Grips) if you want to experiment with shapes. A digital timer (I use my Kitchenaid 30-minute) ensures you don't overbake.
For presentation, a wire cooling rack (like OXO Good Grips) keeps cookies crisp as they cool. And finally, a fine-mesh sieve helps distribute the flaky sea salt evenly for that professional finish. These upgrades aren't essential, but they'll elevate your baking game to the next level.
Nutrition facts
Frequently asked questions
Why does brown butter make these cookies taste so different?
Brown butter adds a complex, nutty depth that regular butter can't match! When butter browns, its milk solids caramelize, creating flavors reminiscent of caramel and toasted nuts. This transforms your cookies from sweet to rich and sophisticated. The aroma alone makes these taste like they came from a high-end bakery.
Can I substitute regular butter for brown butter?
Technically yes, but you'll miss the signature flavor. If you must, try adding 1 teaspoon of vanilla extract plus 1/2 teaspoon of brown sugar to 1 cup melted regular butter to mimic some of the caramelized notes. However, nothing beats the authentic taste of properly browned butter in these cookies.
How do I know when the brown butter is done?
The butter is perfect when it smells like caramelized popcorn and toffee! It should be golden brown with small brown flecks at the bottom of the pan. Watch closely—the moment it turns dark brown, it burns quickly. Immediately remove from heat and let it cool before using.
Should I chill the dough overnight?
While not required, chilling overnight enhances flavor development. The dough can stay in the fridge for up to 2 days or be frozen for 3 months. For best results, chill at least 30 minutes before baking to prevent spreading and improve texture.
What if my cookies spread too much?
This usually happens if the dough isn't chilled enough or the butter is too warm. Next time, chill the dough longer (up to 2 hours) and use room-temperature eggs. Also ensure your oven is properly calibrated—350°F is critical. For thicker cookies, scoop 1.5 tablespoons instead of 2.