
Desserts
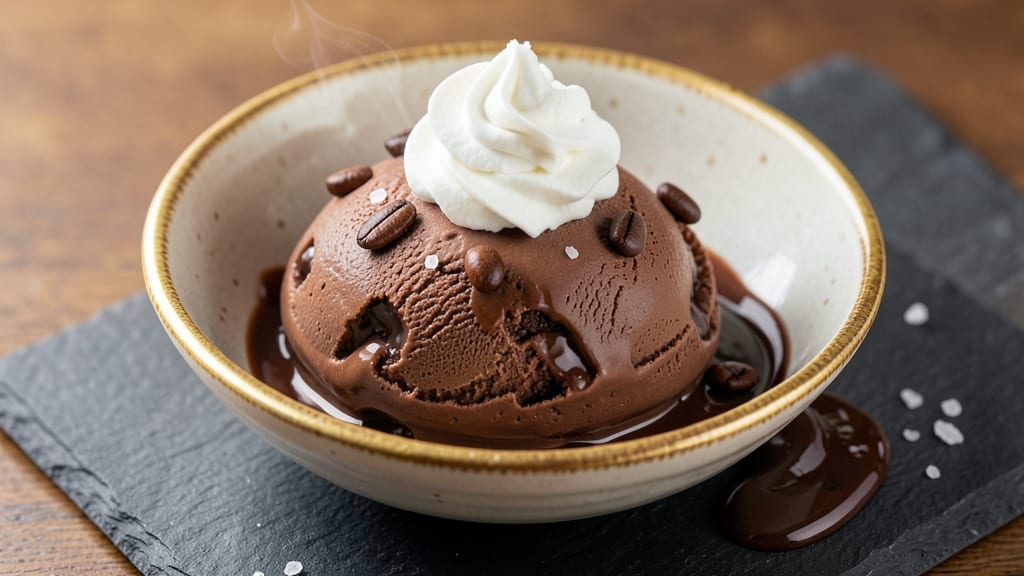
This Belgian dark chocolate ice cream recipe delivers rich, velvety texture with layers of deep cocoa and espresso intensity that rivals artisanal gelato. 💫 The secret lies in tempering eggs with sugar to create a stable base, then folding in 70%+ cocoa Belgian chocolate that melts into luxurious silkiness.
What sets this apart is the espresso infusion—just a splash of strong brew—enhancing the chocolate's natural bitterness without overpowering its complexity.
The process begins with a silky custard base that chills before churning, ensuring a creamy finish without ice crystals. Unlike store-bought versions, this recipe avoids stabilizers, relying instead on proper technique: slow melting of chocolate, precise egg tempering, and a gentle churn that incorporates air for lightness.
The result? A dessert that balances intense chocolate flavor with smooth, melt-in-your-mouth texture—perfect for those who crave depth without sweetness.
Serve this ice cream straight from the freezer with a drizzle of raspberry coulis or a sprinkle of flaky sea salt to contrast the bitterness. The espresso notes add an unexpected sophistication, making it ideal for impressing guests or treating yourself after a long week.
Whether enjoyed alone or paired with shortbread cookies, this recipe transforms a simple dessert into an experience—one that captures the essence of Belgian craftsmanship.
For best results, use high-quality dark chocolate and freshly brewed espresso. The custard method ensures a creamy, restaurant-quality texture that freezes beautifully. Let’s create something extraordinary—this ice cream is worth every minute of effort.
Ingredients for belgian dark chocolate ice cream
High-quality ingredients transform into luxurious Belgian dark chocolate ice cream with velvety texture and espresso depth.
| Ingredient | Amount | Notes |
|---|---|---|
| Large Egg Yolks 🥚 | 6 whole | Fresh, high-quality preferred |
| Granulated Sugar 🍚 | 1 cup | Superfine for smoother texture |
| Heavy Cream 🥛 | 2 cups | 36% fat for optimal richness |
| Whole Milk 🥛 | 1 cup | Warmed for better emulsification |
| Dark Chocolate (70%+ Cocoa) 🍫 | 12 oz | Belgian chocolate, chopped fine |
| Strong Espresso ☕ | ¼ cup | Freshly brewed, cooled |
| Vanilla Extract 🌿 | 1 tsp | Pure Madagascar preferred |
| Salt 🧂 | ¼ tsp | Fine sea salt for balance |
| Unsalted Butter 🧈 | 2 tbsp | Cold, cubed for texture |
| Raspberries (Optional) 🍓 | ½ cup | Fresh or frozen for coulis |
| Flaky Sea Salt 🧂 | 1 tbsp | For garnish, Maldon preferred |
The chocolate is non-negotiable—Belgian 70%+ cocoa bars from Valrhona or Callebaut deliver the depth this recipe demands. Look for evenly tempered bars with a glossy finish; avoid pre-shredded or chips. For espresso, freshly brewed, cooled beans (like Lavazza or Illy) make the difference—never instant. The heavy cream should be cold and full-fat; Hormel or Organic Valley brands are reliable. Egg yolks must be fresh and room temperature—older yolks can create a grainy texture. If using frozen raspberries, thaw and strain seeds for a silky coulis.
No Belgian chocolate? High-quality 70%+ cocoa from Ghirardelli or Lindt works in a pinch, though the flavor profile will differ. Short on espresso? Strong cold brew at half the amount adds depth, but fresh-brewed is ideal. The vanilla extract is optional but recommended—imitation extracts will lack complexity. For a dairy-free version, substitute full-fat coconut cream for the heavy cream and milk, though texture will be lighter. The butter adds richness; European-style brands melt more smoothly. If you prefer less sweetness, reduce sugar to 3/4 cup and add 1 tsp instant espresso powder to enhance chocolate intensity.
This ice cream freezes best when pre-chilled for 6-8 hours before churning—never serve it immediately after freezing. Store in an airtight container with parchment between layers to prevent freezer burn. It keeps for up to 2 months; texture may soften slightly after 1 month. For serving, let it sit at room temperature for 5-10 minutes before scooping. The raspberry coulis can be made ahead and stored in the fridge for 3 days—simply blend thawed raspberries with 1 tbsp sugar and strain. Garnish with flaky salt just before serving to contrast the bitterness.
Why You'll Love This Recipe
- No Whisk Arm Fatigue: I swear by the tempering trick with egg yolks and sugar—just a quick double-boil, then stir like you’re mixing paint. The custard comes together faster than ordering takeout, and honestly? My arm thanks me every time.
- Rich Without Guilt: That 70%+ cocoa Belgian chocolate melts into the cream like a secret weapon—deep, bittersweet, but balanced by the velvety yolks. It’s the kind of dessert that makes you pause mid-bite, even when you’re “just eating healthy.”
- Weeknight Date Night: No fancy tools, no last-minute grocery runs. I make this when my partner’s craving something indulgent but doesn’t want to cook. Serve it straight from the freezer with a sprinkle of flaky salt, and suddenly? You’re hosting a Michelin-star moment.
- Freezer-Friendly Luxury: Batch it on Sunday, and you’ve got a month’s worth of “I deserve this” moments. The texture stays silky if you let it temper for 24 hours—no grainy ice crystals, just pure chocolate bliss. And between us? Leftovers taste better the second time.
Step-by-step instructions for Belgian dark chocolate ice cream
Master this technique and you'll create velvety, intensely flavored ice cream with perfect texture.
🍳 Step 1: Infuse the Cream and Milk with Espresso
In a medium saucepan, combine the 2 cups heavy cream and 1 cup whole milk over medium heat. Warm until the mixture reaches 160°F—just before it begins to simmer. Remove from heat and immediately stir in the 0.25 cup strong espresso and 1 tsp vanilla extract. Let steep for 15 minutes while covered, allowing the coffee's deep notes to infuse the dairy base.
This infusion creates the signature espresso intensity that complements the Belgian chocolate. Don't skip the steeping time—it's what transforms ordinary cream into extraordinary flavor. Strain through a fine-mesh sieve to remove any sediment before using.
🍳 Step 2: Create the Chocolate Base
In a separate heavy-bottomed saucepan, melt the 12 oz dark chocolate (70%+ cocoa) over low heat, stirring constantly until completely smooth. Remove from heat and whisk in the 1 cup granulated sugar and 0.25 tsp salt until fully dissolved. Gradually pour in the warm espresso-infused cream mixture while whisking vigorously to create a silky chocolate ganache.
This step builds the foundation for your ice cream's rich, fudgy texture. The sugar helps stabilize the emulsion while the salt enhances all the chocolate's deep cocoa flavors. Let the mixture cool to 110°F before proceeding—this temperature ensures proper emulsification with the egg yolks.
👨🍳 Step 3: Temper the Egg Yolks
In a heatproof bowl, whisk together the 6 whole large egg yolks until pale and slightly thickened. Slowly pour the chocolate mixture into the yolks while whisking constantly—this tempering process prevents scrambling. Return the mixture to the saucepan and cook over low heat, stirring continuously, until it reaches 170°F and thickens enough to coat the back of a spoon.
This tempering creates the custard base that gives your ice cream its signature creamy texture. The slow, gentle heat ensures the eggs cook properly without curdling. Immediately remove from heat and stir in the 2 tbsp cold unsalted butter, cubed, until fully incorporated. The butter adds luxurious mouthfeel and prevents iciness.
⏰ Step 4: Chill and Churn
Strain the custard through a fine-mesh sieve into a clean bowl to remove any lumps. Press plastic wrap directly onto the surface to prevent a skin from forming, then refrigerate for at least 4 hours or until completely chilled. This resting period allows all the flavors to meld together and creates the perfect consistency for churning.
Transfer the chilled custard to an ice cream maker and churn according to the manufacturer's instructions, typically 20-25 minutes, until thick and creamy. If using the optional 0.5 cup raspberries, blend them with 1 tablespoon sugar into a coulis and fold gently into the ice cream during the last 2 minutes of churning.
🍽️ Step 5: Freeze and Serve
Transfer the ice cream to a lidded container and freeze for at least 4 hours to firm up. For best texture, let it sit at room temperature for 5-10 minutes before scooping. Garnish with 1 tbsp flaky sea salt just before serving to enhance the chocolate's depth and provide a delightful contrast of textures.
The final product should be velvety with visible chocolate flecks, intensely chocolatey yet balanced by the espresso's bitterness, and perfectly scoopable. Each bite should deliver rich cocoa complexity with a subtle coffee undertone that lingers beautifully.
Pro Tips For Making Belgian Dark Chocolate Ice Cream
- Temper the Chocolate: Melt the dark chocolate gently—drop chopped pieces into the warm milk (off heat) and let them soften first. I learned this the hard way: dumping cold chocolate into hot cream makes it seize like glue, and no amount of whisking fixes it.
- Whisk Yolks Like Mad: Beat the egg yolks and sugar over a double boiler until they’re pale, thick, and triple in volume—about 8-10 minutes. Stopping early means your ice cream will taste flat and lack that signature Belgian richness.
- Chill the Base Hard: Let the custard cool to room temp before refrigerating, then chill it overnight. Rushing this step risks grainy ice cream—your future self will thank you for the patience.
- Use Cold Cream: Whip the heavy cream cold (straight from the fridge) when folding it into the custard. Warm cream folds in like soup, and your ice cream will turn out icier and less creamy.
Essential equipment for this dish
Ice Cream Maker
An ice cream maker is non-negotiable for this recipe—it creates the signature creamy texture by incorporating air while freezing. I recommend the Cuisinart ICE-21 for its consistent performance and easy cleanup, or the Breville Smart Scoop for its digital controls.
If you're on a budget, the Ninja IC100 delivers excellent results without breaking the bank. Avoid hand-churning unless you're experienced—it's easy to overwork the mixture and create ice crystals. 💫
High-Quality Chocolate
Your chocolate is the star, so invest in Belgian 70%+ cocoa bars like Valrhona Guanaja or Callebaut Grand Cru. These brands melt smoothly and deliver deep, complex flavors. Avoid pre-shredded chocolate—it contains anti-caking agents that alter texture.
For chopping, use a sharp chef's knife or a microplane for fine, even pieces. Store your chocolate in an airtight container in a cool, dark place to maintain freshness.
Thermometer
A candy or instant-read thermometer is essential for precise temperature control. I use the Thermoworks Thermapen One—it's fast, accurate, and durable. For the custard base, monitor temperatures closely: 160°F for the cream infusion, 110°F before tempering eggs, and 170°F for the final custard.
Without a thermometer, you risk overcooking the eggs or undercooking the chocolate, both of which ruin texture. A laser thermometer like the Taylor Precision Products is another great option for hands-free monitoring.
Fine-Mesh Sieve
A fine-mesh sieve (like the OXO Good Grips) removes any lumps from the custard, ensuring a silky-smooth final product. I strain the custard twice: once after cooking to catch any cooked egg bits, and again before churning to eliminate any residual grit.
For chocolate, a sieve with a mesh size of 150 microns works best. If you don't have one, a cheesecloth in a pinch, but it requires more effort to press out all the liquid. This step is critical—skipping it can lead to a grainy texture.
Mixing Bowls
Use heatproof, stainless-steel bowls for tempering the egg yolks—glass can crack under sudden temperature changes. I prefer OXO Good Grips bowls for their durability and ergonomic handles. For the chocolate base, a heavy-bottomed saucepan (like All-Clad) prevents scorching. Avoid non-stick pans—they can react with the acidic chocolate.
Keep your bowls clean and dry to prevent any residual flavors from transferring to your custard. A small whisk (like Zwilling J.A. Henckels) is also essential for smooth, lump-free mixing.
Storage Containers
Transfer your finished ice cream to airtight, freezer-safe containers with parchment paper between layers to prevent freezer burn. I love Pyrex glass containers for their durability and ease of scooping. For long-term storage, quart-sized freezer bags (like Stasher bags) work well—they’re stackable and resealable.
Label your containers with the date to track freshness. Avoid metal containers, as they can react with the acidic chocolate over time and alter flavor. 🧊
Nutrition facts
Frequently asked questions
Why does this recipe use espresso instead of regular coffee?
Espresso adds a concentrated coffee flavor that enhances the chocolate's depth without overpowering it. The strong brew provides a subtle bitterness that balances the sweetness, creating a sophisticated flavor profile reminiscent of Belgian chocolatiers. Plus, it infuses more quickly than regular coffee, so you only need 0.25 cup for maximum impact.
Can I make this ice cream without an ice cream maker?
Yes, but the texture won't be as creamy. Chill the custard thoroughly, then freeze it in a shallow container, stirring vigorously every 30 minutes for 3-4 hours to break up ice crystals. For a smoother result, transfer to a loaf pan, cover with parchment, and freeze for 6 hours, then scoop. Expect a denser texture than machine-churned versions.
What if my ice cream comes out icy or grainy?
Icy texture usually means the custard wasn't chilled enough before churning. Always refrigerate for at least 4 hours and ensure your ice cream maker's bowl is pre-chilled. Graininess often comes from lumps in the chocolate or eggs—strain the custard twice through a fine-mesh sieve. For extra smoothness, add 1 tbsp corn syrup per quart of mixture to prevent ice crystals.
How do I store leftover ice cream to maintain texture?
Transfer to an airtight container with parchment between layers to prevent freezer burn. Press plastic wrap directly on the surface before sealing. It keeps for up to 2 months with optimal texture. For serving, let it sit at room temperature for 5-10 minutes before scooping. Avoid refreezing thawed portions—they'll develop ice crystals.
What's the best way to serve this ice cream?
Serve in chilled glass bowls with a drizzle of raspberry coulis and a sprinkle of flaky sea salt to contrast the chocolate's richness. For an elegant touch, garnish with chocolate shavings or a dusting of cocoa powder. Pair it with shortbread cookies or Belgian waffles for a complete dessert experience. The espresso notes make it perfect with dark fruit compotes like blackberry or fig.