
Desserts
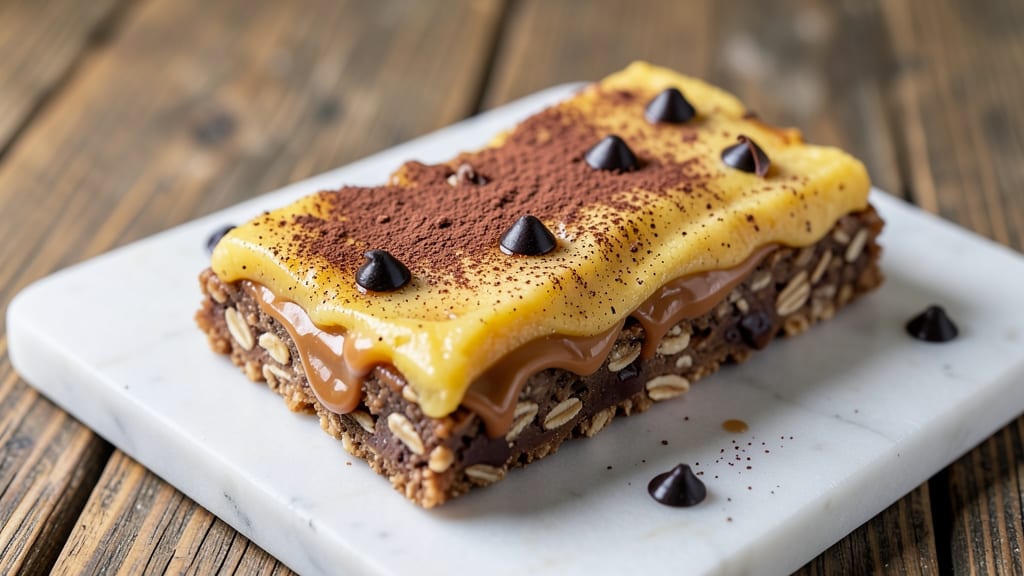
This banana chocolate protein bar recipe delivers a triple-layered energy boost that’s perfect for post-workout fuel or a satisfying breakfast on the go. 💛 The beauty of this recipe lies in its simplicity—no oven required, just a few wholesome ingredients blended into a nutrient-packed bar that’s rich in plant-based protein and natural sweetness.
The foundation starts with ripe bananas mashed into a thick base, layered with a creamy almond butter mixture, and finished with a decadent chocolate coating. This no-bake approach ensures minimal effort while maximizing flavor and texture—think chewy, fudgy, and satisfying in every bite.
The best part? These bars keep well in the fridge for up to a week, making them an ideal meal prep solution.
What makes these bars stand out is their balanced nutrition—packed with protein from plant-based sources, fiber from oats, and healthy fats from nuts. They’re naturally sweetened, so you won’t miss refined sugar, and the chocolate layer adds that indulgent touch without guilt.
Whether you’re fueling up for a workout or craving a dessert-like snack, these bars deliver.
Ready in just 15 minutes of prep and 30 minutes of chilling, these protein bars are a game-changer for anyone looking for a quick, wholesome treat. Serve them as a post-gym snack, a breakfast replacement, or a guilt-free dessert. Here’s how to make them!
Ingredients for banana chocolate protein bar
Eight wholesome ingredients create a triple-layered energy bar with no-bake convenience and plant-powered nutrition.
| Ingredient | Amount | Notes |
|---|---|---|
| Ripe Bananas 🍌 | 2 cups | Mashed to thick consistency |
| Almond Butter 🥜 | 1 cup | Natural, unsweetened preferred |
| Vanilla Protein Powder 💊 | 1 cup | Plant-based vanilla flavor |
| Old-Fashioned Rolled Oats 🌾 | 2 cups | Gluten-free if needed |
| Chocolate Chips 🍫 | 1 cup | Vegan dark chocolate |
| Unsweetened Cocoa Powder 🍫 | ½ cup | Natural, unsweetened |
| Maple Syrup 🍯 | ¼ cup | Pure grade B preferred |
| Ground Flaxseed 🌱 | 2 tbsp | For binding and omega-3s |
| Coconut Oil 🥥 | ¼ cup | Melted for chocolate layer |
| Sea Salt 🧂 | ¼ tsp | Fine grain preferred |
| Chia Seeds 🌱 | 1 tbsp | For extra fiber and binding |
| Almond Flour 🥜 | ½ cup | For texture and protein |
The bananas are the heart of this recipe—ripe ones with brown speckles ensure natural sweetness and creaminess. Trader Joe's or Whole Foods typically carry the sweetest varieties, but any overripe bananas from your fruit bowl will work. For the protein powder, Orgain or Naked Nutrition brands offer high-quality plant-based options with clean ingredients. The almond butter should be natural, unsweetened—avoid the jarred versions with added oils or sugars. Costco often has bulk almond butter at a better price than single-serve jars. Pre-measure your oats and protein powder to streamline the mixing process, especially if you're making these for meal prep.
No almond butter? Sunflower seed butter or cashew butter work beautifully as substitutes. The chocolate chips can be swapped for vegan carob chips if you prefer a less sweet option. Dutch-processed cocoa powder is ideal here—it's smoother and more flavorful than natural cocoa. If you're out of maple syrup, agave nectar or date syrup will work in a pinch, though the flavor profile differs slightly. The flaxseed and chia seeds are non-negotiable for binding, but if you're sensitive to seeds, psyllium husk powder can replace them at half the amount. For the chocolate layer, melted vegan dark chocolate is a luxurious alternative to the coconut oil base, though it requires slightly more effort.
Store the bars in an airtight container in the fridge for up to 7 days—they’ll keep their texture and flavor beautifully. For longer storage, wrap individual bars in parchment paper and freeze them for up to 3 months. The chocolate layer may soften slightly when chilled, but it firms up at room temperature. These bars are perfect for meal prep—portion them into single servings right after chilling so they’re grab-and-go ready. The oats and protein powder can be pre-mixed in a container to save time during assembly, and the chocolate layer can be prepped ahead and stored separately until ready to use.
Why You'll Love This Recipe
- No-Fuss Mixing: I swear by my food processor for this one—just toss in the bananas, almond butter, and protein powder, pulse until smooth. The oats and chocolate chips get folded in by hand, and honestly? That’s the most effort I’ll put into a snack all month.
- Rich Without Guilt: The combo of ripe bananas and almond butter gives it that velvety sweetness, while the vanilla protein powder keeps it balanced. Throw in a handful of chocolate chips, and suddenly you’ve got dessert-level flavor that won’t leave you crashing later.
- Lunchbox Hero: These bars hold up perfectly for days—no soggy edges, no weird textures. I pack them for work, gym bags, or my kid’s school lunchbox, and they’re always gone by afternoon. (Yes, even on a Tuesday night.)
- Budget-Friendly Power: Almond butter and oats stretch my grocery budget, and using overripe bananas means less waste. Plus, the protein powder makes a batch last me a week, so I’m not constantly buying snacks. Win-win.
Step-by-step instructions for triple-layered banana chocolate protein bars
This no-bake process delivers a perfect textural contrast every time—crunchy base, creamy almond butter layer, and fudgy chocolate top.
👨🍳 Step 1: Prepare the Banana-Oat Base
In a large mixing bowl, combine the 2 cups ripe bananas (mashed to a thick consistency) with the 1 cup vanilla protein powder, 2 tbsp ground flaxseed, 1 tbsp chia seeds, and 0.25 tsp sea salt. Use a sturdy spatula to mix until fully incorporated—you should see a thick, dough-like consistency form. This binding step is crucial; the flaxseed and chia seeds will help hold everything together without baking.
Next, fold in the 2 cups old-fashioned rolled oats and 0.5 cup almond flour using a gentle folding motion. Avoid overmixing—just combine until the oats are evenly distributed. The mixture should be thick enough to hold its shape when pressed between fingers. If it feels too loose, add 1-2 more tablespoons of oats to strengthen the base layer.
🍳 Step 2: Create the Almond Butter Layer
In a separate small bowl, combine the 1 cup almond butter with 0.25 cup maple syrup. Warm the almond butter slightly (about 30 seconds in the microwave) to make it more spreadable—this creates a smoother, more cohesive layer. Stir until completely smooth, then set aside. This layer will provide the creamy contrast between the crunchy base and chocolate top.
Line an 8x8-inch baking pan with parchment paper, leaving an overhang on all sides for easy removal. Press the banana-oat mixture firmly into the pan, creating an even layer about ¼-inch thick. Use the back of a spoon to smooth the surface—this ensures clean layer separation later. Chill the pan in the refrigerator for 15 minutes while you prepare the chocolate layer.
🥘 Step 3: Assemble the Chocolate Topping
In a microwave-safe bowl, melt the 0.25 cup coconut oil in 20-second intervals, stirring between each interval until completely liquid. Add the 0.5 cup unsweetened cocoa powder and 0.25 cup maple syrup, then whisk vigorously until smooth. Fold in the 1 cup chocolate chips until evenly distributed—you should see melted chocolate clinging to the chips.
Remove the chilled banana base from the refrigerator. Spread the almond butter mixture evenly over the top, then immediately pour the chocolate mixture over the almond butter. Use the back of a spoon to gently spread the chocolate into an even layer, about ⅛-inch thick. Tap the pan lightly on the counter to help the chocolate settle and remove any air bubbles.
⏰ Step 4: Set and Slice for Perfect Bars
Return the assembled pan to the refrigerator and let it set for at least 2 hours, or until the chocolate layer is firm to the touch. This chilling time is non-negotiable—it allows all layers to fully solidify and prevents the bars from crumbling when sliced. For best results, chill overnight for even firmer texture.
Once set, carefully lift the bars from the pan using the parchment overhang. Using a sharp knife, cut the bars into 8 equal squares (about 2x2 inches each). For clean cuts, dip the knife in hot water between slices to prevent sticking. Wrap individually in plastic wrap or store in an airtight container in the refrigerator for up to 5 days—these bars keep beautifully!
Pro Tips For Making Banana Chocolate Protein Bar
- Mash Bananas Properly: Don’t just smash them with a fork—use a potato masher or fork to crush the bananas until they’re smooth but still slightly textured. Over-blending turns them into glue; under-mashing leaves dry spots. (Yes, even if you’re impatient like me.)
- Toast the Oats: Dry-toast the rolled oats in a pan for 3–5 minutes until golden and fragrant. This deepens their flavor and prevents the bars from tasting raw. Skip this, and you’ll regret the blandness later.
- Chill Before Slicing: Let the mixture sit in the fridge for at least 30 minutes before cutting into bars. Cold bars hold their shape better, and you’ll avoid a messy, crumbly disaster. (Trust me, I’ve learned this the hard way.)
- Mix Chocolate In Last: Fold in the chocolate chips right before pressing the mixture into the pan. If you add them early, they’ll melt into the batter, leaving you with a sad, streaky texture instead of pockets of gooey chocolate.
Common mistakes when making this dish
Overmixing the Base
I’ve learned the hard way that overmixing the banana-oat base turns your bars into a dense, dry brick instead of a chewy, satisfying treat. Once you’ve combined the mashed bananas, protein powder, and flaxseed, fold in the oats just until they’re evenly distributed—about 10-12 strokes with a spatula.
Overmixing activates the gluten in oats, creating a tough texture. If your mixture feels too loose, add 1-2 tbsp more oats instead of overworking it. 💡
Skipping the Chill Step
Rushing the 15-minute chill before adding the almond butter layer is a recipe for disaster. Without this step, the banana base won’t hold its shape, and the almond butter will sink into it instead of creating a clean, creamy layer.
Trust me, the extra 15 minutes in the fridge saves you from a mushy mess. For the final chocolate layer, the 2-hour set time is just as critical—cutting too soon means crumbly bars that fall apart at the first bite.
Uneven Layer Distribution
Pressing the banana-oat base too thin or too thick throws off the entire texture balance. Aim for a ¼-inch thick layer—any thinner, and the almond butter layer will dominate; any thicker, and the chocolate topping won’t set properly.
Use the back of a spoon to smooth the surface evenly, and tap the pan gently on the counter to compact it. For the chocolate layer, spread it to a ⅛-inch thickness—too thick, and it won’t firm up; too thin, and the flavor will be weak. 🍫
Using the Wrong Chocolate
Not all chocolate chips are created equal! If your chips contain dairy or aren’t labeled vegan, the chocolate layer will seize up or develop a grainy texture. Stick to 100% vegan dark chocolate chips (like Enjoy Life brand) or melt vegan dark chocolate bars for a smoother finish.
Avoid white chocolate chips—they melt differently and can make the bars too sweet. Pro tip: If your chocolate layer looks too thick, warm it slightly (just 10 seconds in the microwave) to make it more spreadable.
Ignoring the Binding Agents
The flaxseed and chia seeds are the secret weapons in this no-bake recipe—they’re what hold everything together without eggs or baking. If you skip them or use too little, your bars will crumble when sliced. Measure them precisely: 2 tbsp ground flaxseed and 1 tbsp chia seeds are non-negotiable.
For extra insurance, let the seeds sit in 2 tbsp water for 5 minutes before mixing—they’ll thicken slightly and bind even better. 🌱
Not Prepping the Pan Properly
Skipping the parchment paper or not leaving enough overhang is a rookie mistake. The parchment prevents the bars from sticking to the pan, and the overhang makes removal a breeze. Press the paper firmly into the corners of the pan so it doesn’t shift when you lift the bars.
If you’re in a pinch, lightly grease the pan with coconut oil in addition to the parchment, but don’t rely on grease alone—it won’t prevent sticking like parchment does.
Nutrition facts
Frequently asked questions
Can I make these protein bars without almond butter?
Swap almond butter for sunflower seed butter or cashew butter—both work beautifully and provide similar creaminess. For a nut-free option, try tahini (sesame paste) mixed with a splash of maple syrup to mimic the texture. Just reduce the maple syrup in the almond butter layer by 1 tablespoon if using tahini, as it's naturally sweeter.
How do I store these bars for longer shelf life?
For maximum freshness, store the bars in an airtight container in the fridge for up to 7 days. To extend their shelf life, wrap individual bars in parchment paper and freeze them for up to 3 months. The chocolate layer may soften slightly when thawed, but it firms up at room temperature. For meal prep, portion them into single servings right after chilling to keep them grab-and-go ready.
Why do my bars taste bitter? What can I fix?
Bitterness usually comes from overusing cocoa powder or protein powder. Start by reducing the cocoa powder to 0.375 cup and check the protein powder's flavor profile—some vanilla blends can taste bitter. For extra sweetness, add 1-2 tablespoons of date syrup or maple syrup to the chocolate layer. Also, ensure your chocolate chips are high-quality vegan dark chocolate, not white or milk chocolate.
Can I make these bars gluten-free?
Yes! Simply replace the old-fashioned rolled oats with certified gluten-free oats (like Bob's Red Mill brand) and ensure your almond flour and protein powder are also gluten-free. The rest of the ingredients are naturally gluten-free, so no other substitutions are needed. Double-check labels on your chocolate chips and cocoa powder to confirm they're gluten-free as well.
What’s the best way to cut clean, even slices?
Use a sharp knife and dip it in hot water between each slice to prevent sticking. For extra clean edges, chill the bars for an additional 30 minutes before cutting. Press down firmly but steadily—don’t saw back and forth. If the bars still crumble, they likely need more chilling time. For a professional finish, use a pizza wheel or bench scraper instead of a knife.